Embroidered Heart Tunic
One of my favorite sewing blogs to follow is Simple Simon and Company. Liz and Elizabeth always have such cute project ideas and tutorials, and I love seeing what they come up with. They have another blog called Project Run and Play, and this month they are having a sewing challenge featuring hand-work on children's clothing. The ladies at Frances Suzanne chose this challenge for this month, and I was so excited to participate! I have seen their work over the past couple of years, and they have the most amazing handwork on the beautiful clothing they sew for their darling nieces. Everything I have seen is expertly crafted and gorgeous.
I am no expert in embroidery, and consider myself a beginner. However, I didn't let that scare me away from sewing along!
From the start of this project, I had a picture in my mind of what I wanted to make. I was originally inspired by this shirt from Anthropologie, and I wanted to make a version of it for my daughter.
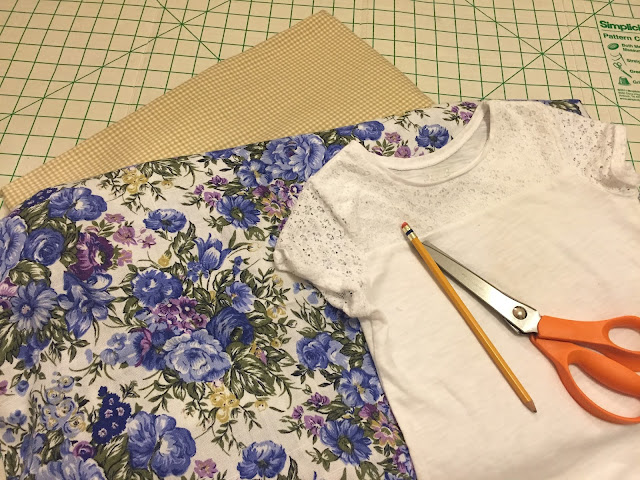
I envisioned a breezy tunic with a slight gather on the back, made with two very different patterned fabrics that color-coordinated. When I looked in my sewing closet, I found the perfect fabric pairing; a yellow and cream gingham, and a beautiful floral fabric with blues, purples, green, and yellow that matched the gingham's shade almost exactly.
I bought these two fabrics one day when I ventured into the Habit for Humanity Restore. I love going into that store, they have so many interesting items, and great deals on fabric and notions! Each of these fabrics only cost me $1 per yard, and there were 1 1/2 yards of the yellow gingham, and 4 yards of the floral.
To cut out the pieces for the shirt, I took one of my daughter's T-shirts that fits her well, and used it to estimate the sizing and trace its shape onto the fabrics. I cut out a piece of gingham for the front, and both gingham and floral for the back. Since I wanted gathers in the back, I cut the floral fabric a couple inches wider than the shirt.
The shirt also needed sleeves to protect my daughter's shoulders from the sun, so I took a sleeve pattern piece from a dress pattern in her size (it was already in my sewing closet to be used in a Christmas dress) and cut out two sleeves in the floral fabric. I like to use my pinking shears, because they help keep my fabric from unravelling as fast. :)
After I had all my pieces cut out, I started the design on the front of the bodice. I sewed two pieces of ribbon onto the top to frame the embroidery, which naturally draws the eye to the part of the shirt I wanted to highlight. Then I drew three hearts between the ribbons, and began to embroider around them in a light purple embroidery floss that matched the floral fabric.
After I outlined the hearts, I embroidered inside with a dark magenta embroidery floss. I chose to weave the floss on the middle heart...
...and to embroider vertical lines on the side hearts.
Each heart is a little different, and I like it that way. It is sweet and unique, just like my daughter for whom it was made.
After finishing the embroidery portion of this shirt, I sewed together the back, and attached the sleeves. The shirt needed a lining to cover the embroidery and the gathers, so I traced the outline of the shirt on an old white sheet I found in my fabric pile. It was nice and soft, and I knew it would be more comfortable this way.
I made sure to cover all of the potentially scratchy parts of the shirt, and I think it will protect the back side of the embroidery from fraying, as well.
Only the very top part of the back yoke is lined. I did this to keep the shirt breezy and cool, so my daughter can have fun and not overheat while playing in it.
The lining turned out as well as I could have expected, and should help the shirt to last a long time. :)
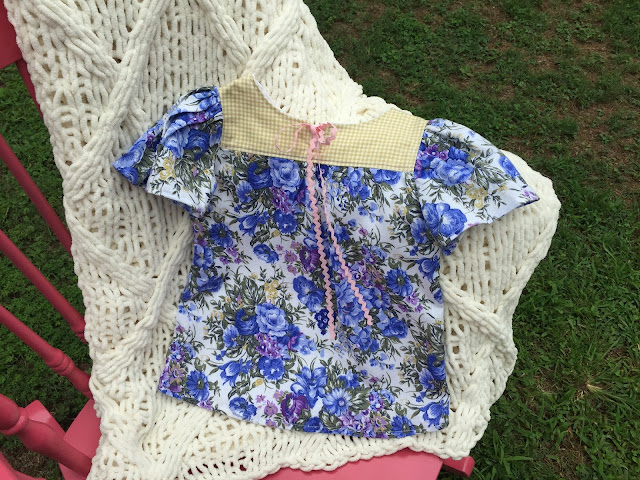
I also added two pockets to the bottom of the shirt in a light pink fabric which match the ric-rac on top of the white eyelet ribbon.
The shirt turned out just as I had hoped: fun, unique, and sure to be loved for a long time.
The sleeves are very loose and flow in the summer breeze, which makes them perfect for the last summer days we are now having.
My daughter loves the pockets, and they are the perfect size for her little hands. :)
This shirt has been proved to be easy to play in, and the extra room in the back gives her plenty of space for bending, jumping, and twirling like a ballerina.
I had so much fun creating this little shirt. Fortunately, everything I used to make it was already in my sewing supplies and fabric stash.
The best part was seeing how excited my little girl was when she watched me make it, and how pleased she was when she first tried it on. She is a happy camper!
If you get a chance, you should check out Project Run and Play! So many people have submitted such beautiful work, and all of the outfits are amazing!
-Bridget :)


Comments
Post a Comment